Welcome to
Home Appliance Diy
Tumble dryer v4 kit
 |
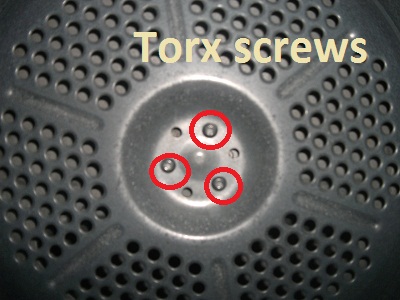
The V4 kit (part number c00113038)consists of a shaft ,pin ,4 x front pads and both types of rear bearing ,if there are 3 torx screws in the center of the drum then the shaft will fit the drum.The front seal and rear seals are no longer included in the kit.The kit will fit both tumble dryer and the condenser dryer. |
When you open the door and look inside the drum , if there is 3 torx screws in the center of the drum then the drum shaft can be changed using the shaft in the v4 kit . If there is no torx screws and the the shaft is damaged then a c00305794 kit will be required. |
 |
<
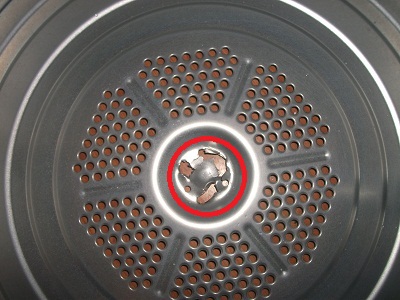 |
If it looks like this then a new drum is required,the shaft has been ripped from the drum. |
This type of drum can have the rear shaft removed just drill the rivet heads off (doesn`t take alot) and fit the c00305794 shaft kit. |
 |
 |
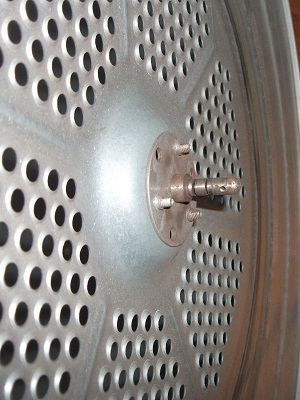
With the c00305794 kit just drill off the old shaft and bolt on the new shaft with all the parts in the kit. |
Remove the 3 torx screw frow inside the drum and the shaft should fall off. The new one in the kit can now be fitted (with the 3 new screws). |
 |
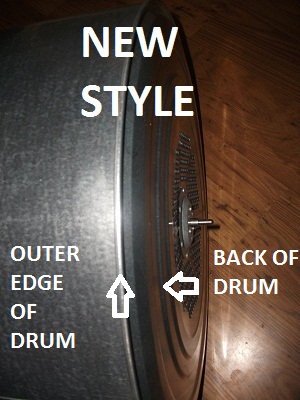 |
This is the new style and the back of the drum sticks out further than the outer edge . This takes a 16mm rear seal , DO NOT FIT THE 22mm REAR SEAL with this drum . |
This is the old style and the back of the drum doesn`t stick out further than the drum rear . This takes a 22mm rear seal . |
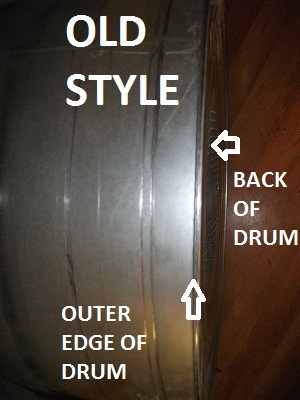 |
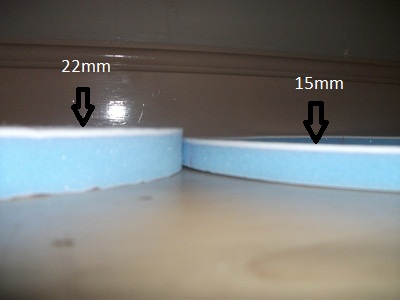 |
Here we have the 22mm and the 15mm seal. |
UNPLUG FROM MAINS. Remove 2 screws from lid (shown in picture.) |
 |
 |
Push lid ( as shown in diagram ) until it moves back then lift lid.It can be very tight and can need a hard push. |
Remove the four screws as shown in the picture to the left. |
 |
 |
Then remove the two screws at the top of the side panel. |
Remove the plynth by inserting a small flat bladed screwdriver in the 3 places as shown in the picture and slightly lift up to release the 3 clips (one at a time ) then the plynth can be released from the lower clips (The lower clips can be tight and soon break). |
 |
 |
Remove the 2 screws as shown in the picture ( some of the models have a screw underneath shown by the arrow).The side panel slides back and can be removed . |
The insides can now be seen .Release the belt by pulling it over the shaft as you turn the drum. |
 |
 |
Remove the 2 screws to release the shaft cover. |
The drum shaft can now be seen. Remove the pin and release the shaft coller. |
 |
 |
The rear panel can be prised back to remove the drum . |
This is the teardrop type of bearing. |
 |
 |
This is the square type. Part No 1703014(C00113862) 2 part numbers for the same part. |
This is the teardrop type.Part No C00142628. |
 |
 |
Remove the rear bearing by removing the screw(if it`s the square type then it will have to be teased out with a small screwdriver) and inspect the shaft.If the shaft is ok then fit a new bearing.If the shaft is damaged then a new shaft will be needed. |
Remove the 3 torx screw frow inside the drum and the shaft should fall off. The new one in the kit can now be fitted (with the 3 new screws). |
 |
 |
Remove the 4 front pads as shown .If required replace the front seal. |
Remove the rear seal , a small wallpaper stripper is the ideal tool and refit the correct size. |
 |
 |
Remove the backing off the new rear seal and stick on new seal.Give it a good push on. |
Place the belt around the drum first and then put the washer on the drum shaft. |
 |
 |
When the belt is on the drum , line the shaft up with the rear bearing and refit in reverse of above.Once the drum is refitted you can fit the belt (see below). |
The new belt is very tight to fit,the best way is to use a long screwdriver (with no sharp edges).As shown. Re assemble in reverse order. |
 |
If you cannot find what you are looking for or need help then just drop me a message at Appdiy@yahoo.co.uk.